· deepdives · 8 min read
The Future of Web Development: Integrating IoT Devices with WebUSB API
Explore how the WebUSB API lets web apps directly talk to IoT devices, with practical projects, code examples, security and cross-browser considerations, and creative ideas for the future of web-connected hardware.
Introduction - what you can build and why it matters
Imagine building a browser app that can flash a microcontroller, stream live sensor telemetry, and update device configuration - without installing a native driver. That’s the promise of WebUSB: the web as the universal desktop tool for interacting with hardware.
In this article you’ll learn how WebUSB changes the developer workflow for IoT devices, what practical projects you can build today, how to implement the core patterns in code, and what to watch for in terms of security and cross-browser support. You’ll finish with several creative, real-world ideas that show where web-first hardware tooling can go next.
Why WebUSB matters for IoT
- Zero-install workflows: Users interact with devices directly through the browser; no native installers, fewer platform-support headaches.
- Faster prototyping: Web UIs are quick to iterate. Pair them with hardware and you get an immediate feedback loop for device development and demos.
- Cross-platform reach: Modern browsers work on Windows, macOS, Linux, ChromeOS - one app, many devices.
- Integrations: Browser apps can combine live device I/O with cloud services, visualization libraries, and modern web UX.
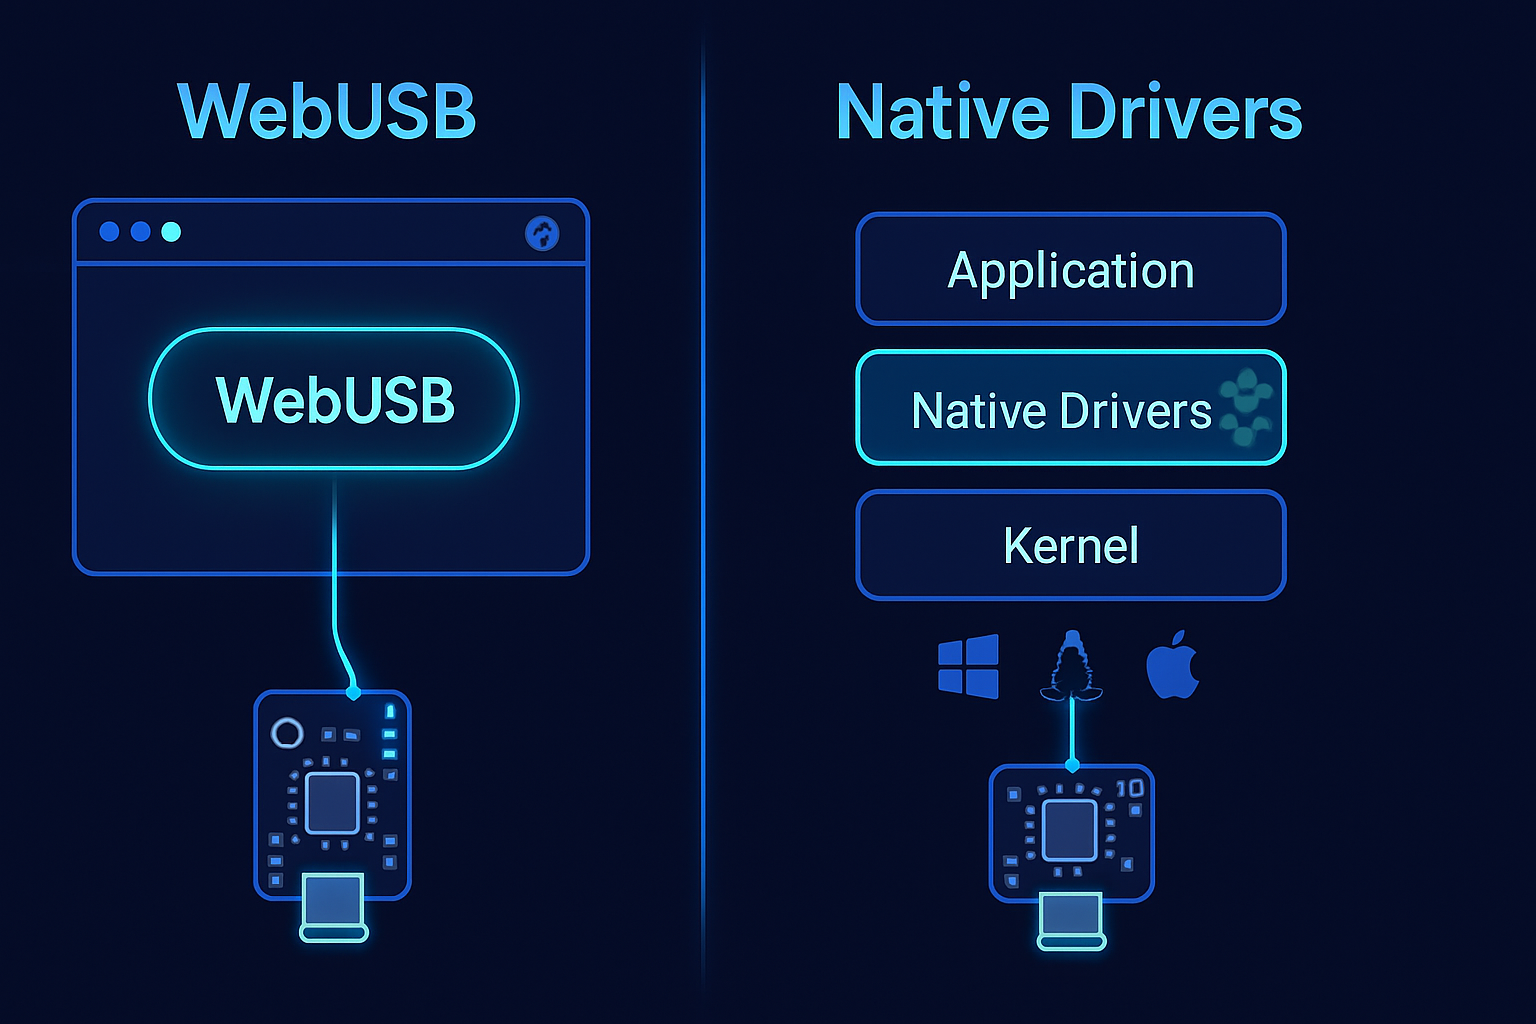
The basics: how WebUSB works (high level)
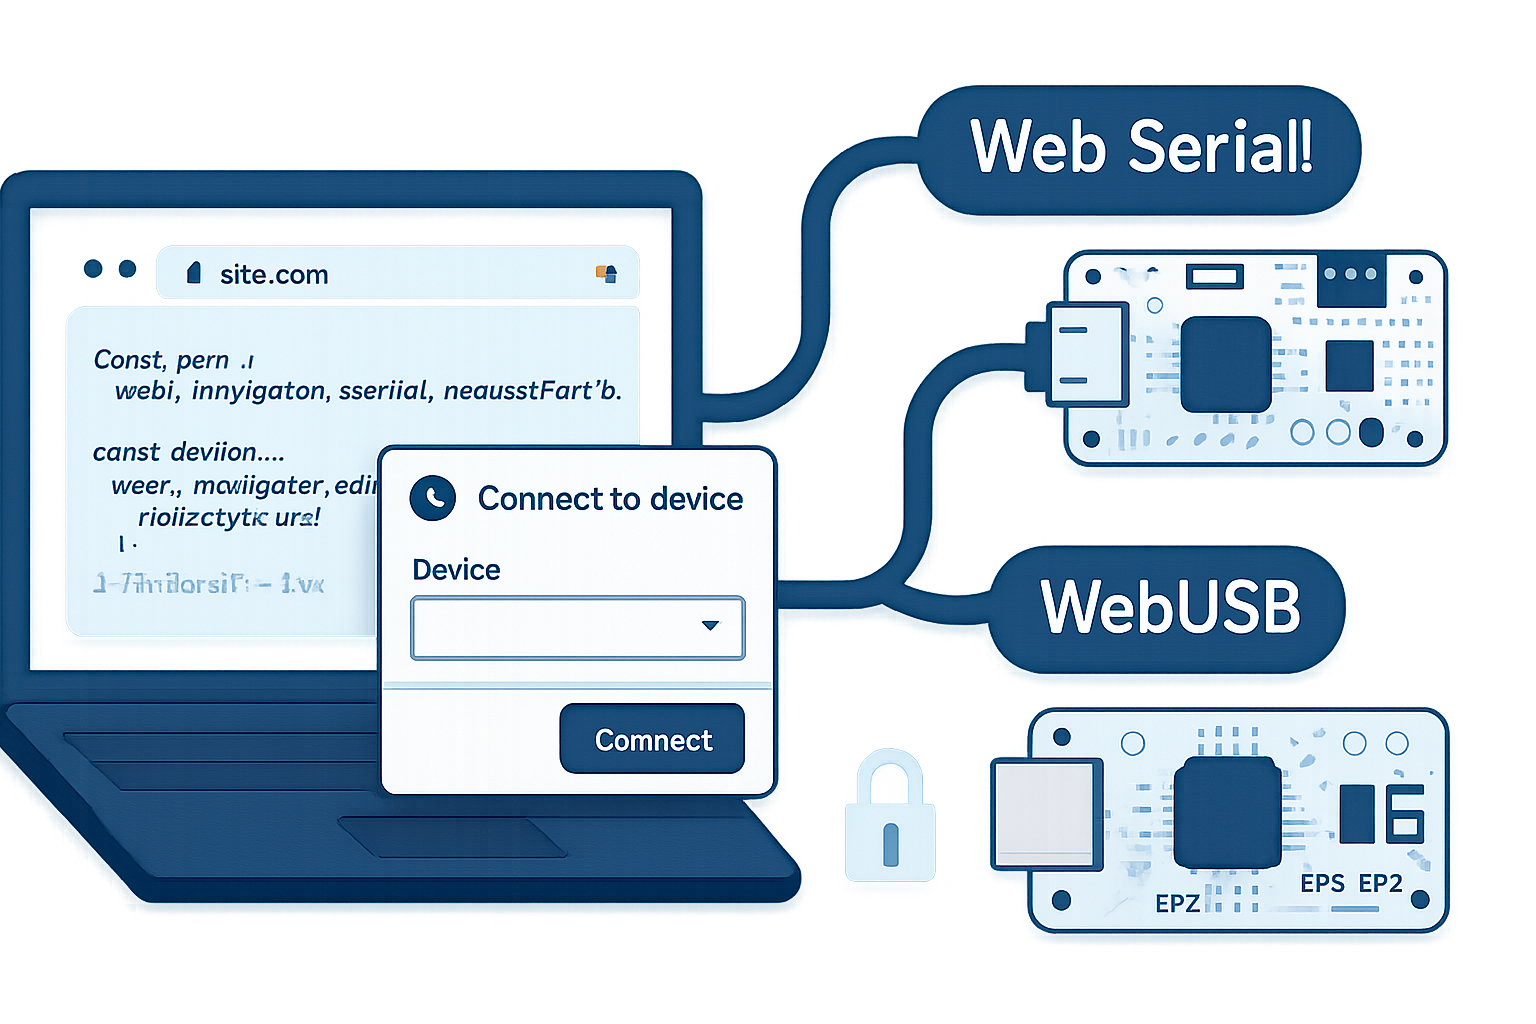
WebUSB is a browser API that gives web pages controlled access to USB devices from JavaScript. Access is gated by user permission, secure contexts (HTTPS), and a user gesture (click). The typical sequence looks like this:
- Call navigator.usb.requestDevice(…) with filters. Browser shows a permission prompt.
- Call device.open(), optionally selectConfiguration(), then device.claimInterface(iface).
- Exchange data via controlTransferIn/Out, transferIn/Out (bulk/interrupt), or using class-specific operations.
- Optionally save references with device.serialNumber++ and reuse permission via navigator.usb.getDevices().
Key constraints and platform notes
- WebUSB requires HTTPS and a user gesture to open the permission prompt.
- Not all browsers support it. Chromium-based browsers have the best support; Firefox and Safari have limited or no WebUSB support (check current compatibility).
- Some common USB classes (CDC-ACM virtual serial) may not be accessible via WebUSB unless the device advertises WebUSB descriptors or uses a vendor-specific interface. For serial-style usage, consider the Web Serial API as an alternative where supported.
References and documentation
- WebUSB spec and explainer: https://wicg.github.io/webusb/
- MDN WebUSB overview and methods: https://developer.mozilla.org/en-US/docs/Web/API/WebUSB_API
- Google developer intro to WebUSB: https://developers.google.com/web/updates/2016/03/access-usb-devices-on-the-web
- TinyUSB (WebUSB-capable stack examples): https://github.com/hathach/tinyusb
- Web Serial API (alternative for serial devices): https://developer.mozilla.org/en-US/docs/Web/API/Serial
A minimal WebUSB example: connect, open, read
This example requests a device that matches a vendor/product filter, opens it, claims the first interface, and reads a single bulk IN transfer. (In real projects handle errors and ensure correct endpoint/interface IDs.)
// Request device (user gesture required)
const device = await navigator.usb.requestDevice({
  filters: [{ vendorId: 0x2e8a }], // example vendor
});

await device.open();
if (!device.configuration) await device.selectConfiguration(1);
await device.claimInterface(0);

// Read from endpoint 1 (replace with your device's IN endpoint)
const result = await device.transferIn(1, 64); // 64 bytes
if (result.status === 'ok') {
  const data = new Uint8Array(result.data.buffer);
  console.log('Received', data);
}

// Close when done
await device.close();
Common operations and patterns
- controlTransferOut / controlTransferIn: Use these for device-specific commands that are implemented as control transfers (DFU, descriptors, vendor commands).
- transferOut / transferIn: Use for bulk or interrupt endpoints (sensor streaming, file transfers, command/response protocols).
- claimInterface / releaseInterface: Claim only the interfaces you need. Release when finished.
- selectConfiguration: Some devices require selecting a configuration before claiming interfaces.
- navigator.usb.getDevices(): Returns devices for which the origin already has permission - useful for persisting connections across sessions.
Practical project ideas and how to build them
- Web-based LED & GPIO console (intro project)
Goal: Control LEDs and read button states on a microcontroller from a browser dashboard.
Why it’s useful: Rapidly demonstrate device behavior to users without installing anything.
How to implement:
- Firmware: Expose a simple USB endpoint or a WebUSB descriptor that accepts short command packets (e.g., {cmd:0x01, pin:13, value:1}). TinyUSB and Arduino have examples for WebUSB-supporting bootloaders.
- Web app: Use requestDevice -> open -> claimInterface -> transferOut to send commands. Use transferIn with a small interval or notify-from-device strategy.
Sample command pseudocode:
// Toggle LED
await device.transferOut(2, new Uint8Array([0x01, pin, value]));- Live telemetry and visualization dashboard
Goal: Stream sensor data (temperature, humidity, accelerometer) to the browser and visualize with Chart.js or D3.
Why it’s useful: Remote demos, local debugging, and product analytics during development.
How to implement:
- Firmware: Package sensor packets as binary frames (timestamp + sensor values) and send on an interrupt/bulk IN endpoint.
- Web app: Use setInterval or read loop to call transferIn and decode frames; append data to charts in real time.
Readable pattern for a streaming loop:
async function readLoop(device, endpointNumber) {
  while (device.opened) {
    const res = await device.transferIn(endpointNumber, 64);
    if (res.status === 'ok') processFrame(new Uint8Array(res.data.buffer));
  }
}- Firmware upload / DFU in the browser
Goal: Flash firmware to microcontrollers directly from the browser.
Why it’s useful: Simplifies end-user experience for devices shipped without native tooling.
How to implement:
- Use a bootloader that supports DFU (Device Firmware Upgrade) over USB and expose DFU commands via control transfers. Many microcontroller vendors provide DFU bootloaders.
- Implement the DFU protocol on the web side using controlTransferOut/In to send firmware chunks and query status. Example: STMicro and LUFA/TinyUSB have DFU examples.
Note: Firmware update is sensitive - implement careful verification, progress reporting, and recovery paths.
- Web-based serial terminal for devices with vendor-specific USB endpoints
Goal: Provide a terminal in the browser for devices that don’t expose CDC-ACM but implement a vendor protocol.
Why it’s useful: Offer a unified development console for embedded devices from any OS.
How to implement:
- Firmware: Implement a simple line-based protocol over a custom bulk endpoint.
- Web app: Provide a text box, send via transferOut, read responses with transferIn, parse line breaks.
- Classroom or lab automation: remote bench via browser
Goal: Students use only a browser to interact with microcontroller kits; instructors can prepare web lessons that push code and exercises to devices.
Why it’s useful: Removes friction for classroom setups and builds reproducible lab experiences.
How to implement:
- Combine WebUSB with a back-end to host lesson assets and telemetry storage.
- Use device discovery and a lesson flow that guides the student to grant permissions and run device tests.
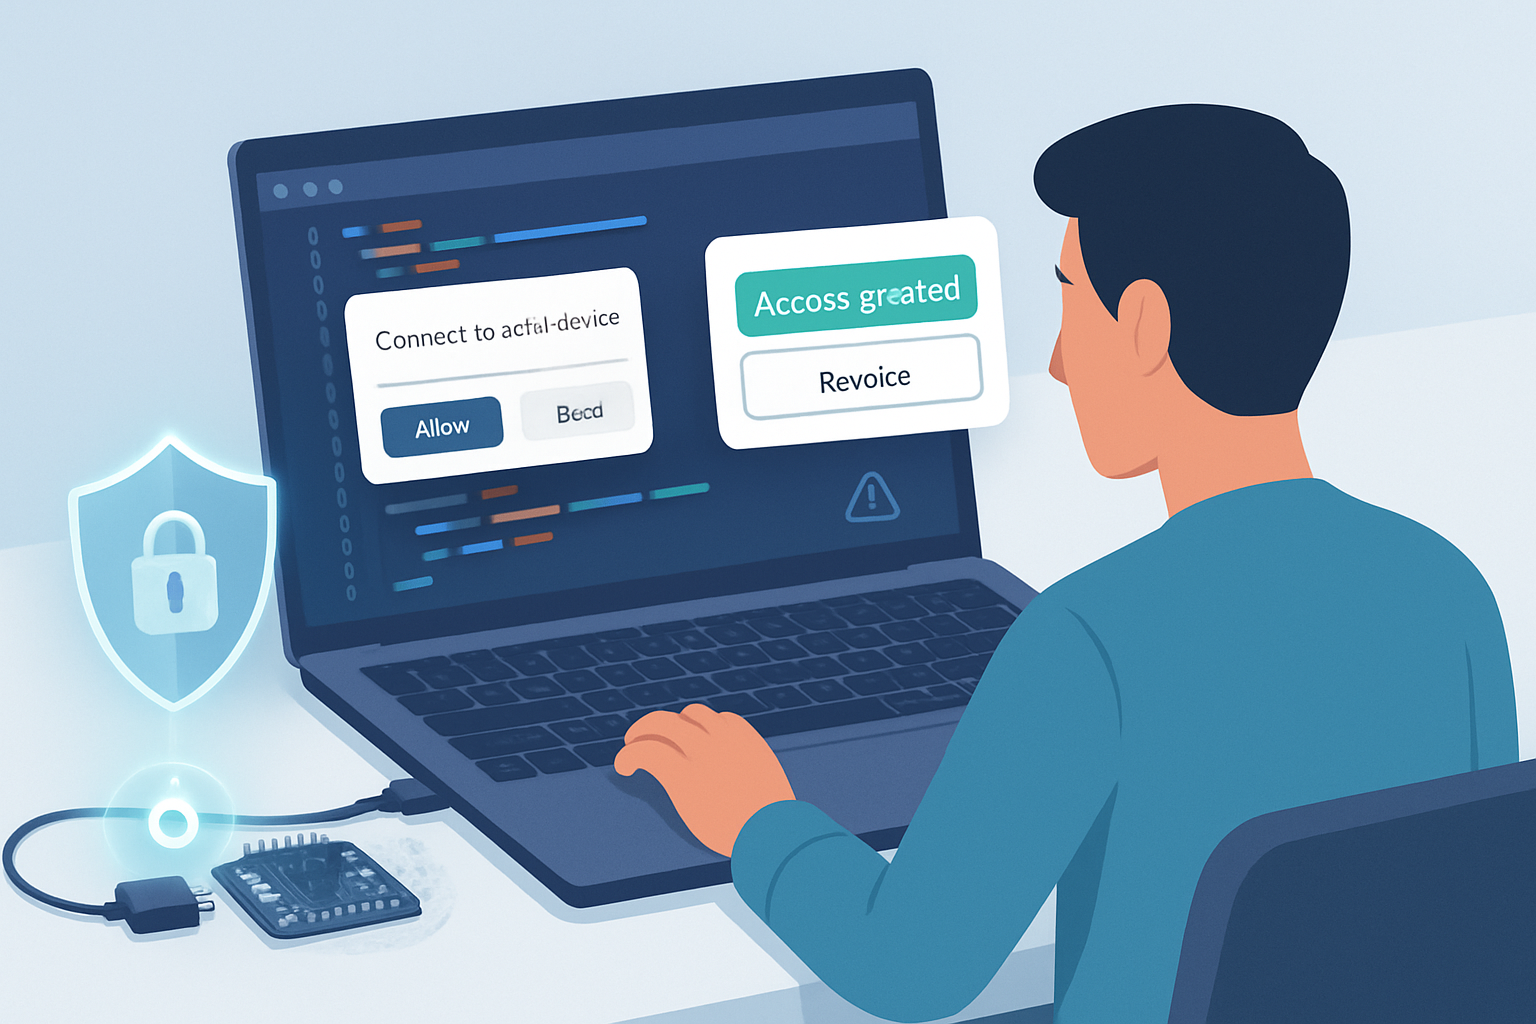
Security, privacy, and UX best practices
- Always require explicit user gesture and show meaningful UI during requestDevice. Users must know why you’re asking for USB access.
- Limit filters: Request only devices you need by vendorId/productId so the permission prompt is focused.
- Use HTTPS and inform users about device-level risks; firmware flashing and raw device access can brick hardware.
- Persist minimal state: Use navigator.usb.getDevices() to restore connections only when appropriate and avoid silently reconnecting.
- Implement timeouts and good error handling. USB communications can be flaky; provide clear error messages and recovery steps.
Cross-browser and ecosystem realities
- Chromium browsers (Chrome, Edge) have the best WebUSB support. Check compatibility at the time you build; other browsers’ support may change.
- Many devices expose CDC-ACM (virtual COM port). WebUSB cannot always access these unless the device advertises a custom interface or has the WebUSB descriptor. For generic serial access, the Web Serial API may be a better fit where supported.
- For broad compatibility, design firmware that can operate in multiple modes (WebUSB-enabled interface + CDC for legacy tools).
Developer tools, libraries, and resources
- TinyUSB: lightweight USB stack for microcontrollers with WebUSB examples: https://github.com/hathach/tinyusb
- webusb/arduino examples and documentation: https://github.com/webusb/arduino
- WebUSB community samples and demos: search the WebUSB GitHub organizations and Chrome samples.
- Use browser DevTools to debug console logs and the Promises returned by WebUSB calls.
Advanced ideas and where this leads
- Browser-based device labs: Host remote-accessible devices in a lab; students or customers connect via a browser to run experiments on real hardware (paired via WebUSB on the lab machine).
- Collaborative hardware debugging: Multiple developers view telemetry and logs in the browser, annotate data, and save sessions - all without native tooling.
- Web-first firmware marketplaces: Users browse device firmwares in the browser and flash with a single click; versioning and rollbacks handled by a web service.
- Edge/browser hybrid apps: Use WebUSB for local device communication, WebRTC for peer-to-peer device sharing, and cloud functions for analytics - all orchestrated from a web UI.
Limitations and cautions
- Not a replacement for everything: Low-level kernel drivers and complex device classes may still require native tooling.
- Security surface: Browsers isolate origins, but device firmware and vendor-specific commands can still cause device damage; validate inputs.
- Ecosystem fragmentation: Varying browser support and device firmware requirements can complicate a universal solution.
Conclusion - the opportunity for web-native hardware tooling
WebUSB unlocks a simpler, faster, cross-platform path for interacting with IoT hardware from the browser. For product demos, developer tooling, firmware workflows, and educational experiences, the web becomes the natural front end for hardware. The practical projects above - LED dashboards, telemetry streams, in-browser firmware flashing, and teaching labs - illustrate how you can start integrating WebUSB into your IoT toolchain today.
As browser support grows and device vendors adopt web-friendly descriptors and bootloaders, expect the web to become the first interface users reach for when they want to control, debug, and update physical devices. Build with security and UX in mind, keep firmware flexible, and you’ll be ready to deliver powerful, zero-install hardware experiences to users worldwide.
References
- WebUSB spec and explainer: https://wicg.github.io/webusb/
- MDN WebUSB API docs: https://developer.mozilla.org/en-US/docs/Web/API/WebUSB_API
- Google Developers: Access USB devices on the web: https://developers.google.com/web/updates/2016/03/access-usb-devices-on-the-web
- TinyUSB repository (examples and stacks): https://github.com/hathach/tinyusb
- Web Serial API docs (alternate path for serial devices): https://developer.mozilla.org/en-US/docs/Web/API/Serial